Saturday, January 24, 2015

Pragmatic Odoo OpenGTS Integration

Pragmatic Odoo OpenGTS integration is a state of art solution for all tracking (geolocation) needs of a company, be it Vehicle tracking or Personal tracking. The Pragmatic’s Module is developed in such a manner that it would suit for all scenarios with the powerful Odoo(formerly OpenERP) modules to match for multifarious industries.

GPS devices: The Pragmatic Odoo OpenGTS module is capable to handling any type of GPS devices and all related information can be captured in structured manner in Odoo. (Limited by OpenGTS device support).

Android Mobile devices: The module also has the capability to integrate Android Mobile devices tracking from OpenGTS.

This write-up details the tracking capabilities of Pragmatic Odoo OpenGTS We are using two type of devices to demonstrate the power of the Pragmatic Odoo OpenGTS module

1. GPS devices Personal Tracker (Sanav GC-101) &
2. Mobile application (CellTrac).

Note: It is mandatory that while configuring the application that the user mention the type of device to add.

Odoo OpenGTS Configuration

 1. Adding Device
- Fleet → Vehicles → Device Configuration → Device Information
- Create a Device and fill in the Device Detail
Note: Device Id field should be Device IMEI number


 1.1 Adding Open GTS User - Click on OpenGTS User → Create and Edit

 Note : OpenGTS Account should be “sysadmin” user should be “admin” and password should be “sysadmin”.

 2. Attaching Device to a Vehicle.
- Fleet → Vehicles → Vehicles
- Select a vehicle to which the device is going to be attached

 - Edit and Goto the Device details tab
- Click on “Add an item”


 2.1 Select/Create an appropriate device from the window and click on “Select”

 3. Adding / Registering the device to the OpenGTS server (if not added before)Click on the “Export to OpenGTS”
 4. Tracking the Device on map- Once the Device is added successfully to the Open GTS server, it can be tracked by clicking on “Show Map” button
 - All the successfully added devices i.e. GC-101/Mobile can be tracked here by specifying the device into the “Vehicle Map:” drop down- Tracking of GC-101 is shown below:
 - Configuration of CellTracGTS Mobile App
   To add Android mobile to be tracked on GTS Server, the mobile should fulfill the following prerequisites.
- Mobile containing Android Version 4.0 or more
- Mobile must contain GPS
- Working GPRS network
- CellTracGTS App (Available on PlayStore)


Once the “CellTracGTS” app is downloaded and installed, it must get configured with the server to send and receive data. The configuration of the CellTracGTS is as follows:

1. The Read-only field “Mobile-ID Type” is the IMEI number of the Mobile which should be exactly added and Exported to the GTS Server through OpenERP OpenGTS Module. It consists two fields i.e. “IMEI” and “Android ID”. Selecting any of them will not affect the server but the same thing should get added to the server. (Its recommended to select IMEI)
2. The field “Server URL” is the Server URL to which the device is suppose to send its data. And it should be exactly “http://gtsserver/gprmc/Data?”
3. Followings are the Screenshots the CellTracGTS application configuration


- Tracking of the vehicle using Mobile Phone is shown Below:
- All the successfully added devices can be tracked on the map by selecting it from the “Vehicle Map” Dropdown.

Here we had seen how the settings in Odoo had been integrated with OpenGTS and the devices configured in Odoo are tracked in OpenGTS.
Feel free to contact us at sales@pragtech.co.in for any further enquires/ details required.

Odoo OpenERP Store/ Shop wise Tax Application

This blog represents enhanced Odoo feature which is related to handling of Taxation through shops/store

In Odoo, we currently handled Taxes based on Product defined/default taxes. This is standard behaviour which can be altered if in case. Taxes are Customer driven, mainly location based. This is achieved through fiscal position where Product Taxes can be replaced with new set of Taxes as per configured in Fiscal Position.


 But if we consider scenario where physical stores are located with point of sale or online sales channels which are driven by store wise taxes, Odoo doesn't provide that facility.

 To handle this condition, we at Pragmatic had developed a module which will take care of shop/ store wise taxes configured and applied on sales. For this it is require configuring default taxes at shop level which will carry over in transactions. This will override Product based taxes on transactions. More over if you don't configure shop wise taxes it will follow the normal/default functionality of Odoo which is product based taxes.

 First of all we define tax on Product say Tax 15%.

We will go ahead and define tax on Shop which will take priority in transactions. So define Tax on shop/store.

If you create Sales quotation with the particular product then it will pick up the taxes from the shop as shown in the below rather than taking the default product taxes.


 You can define different taxes per shops or stores if there multiple physical shops/stores.
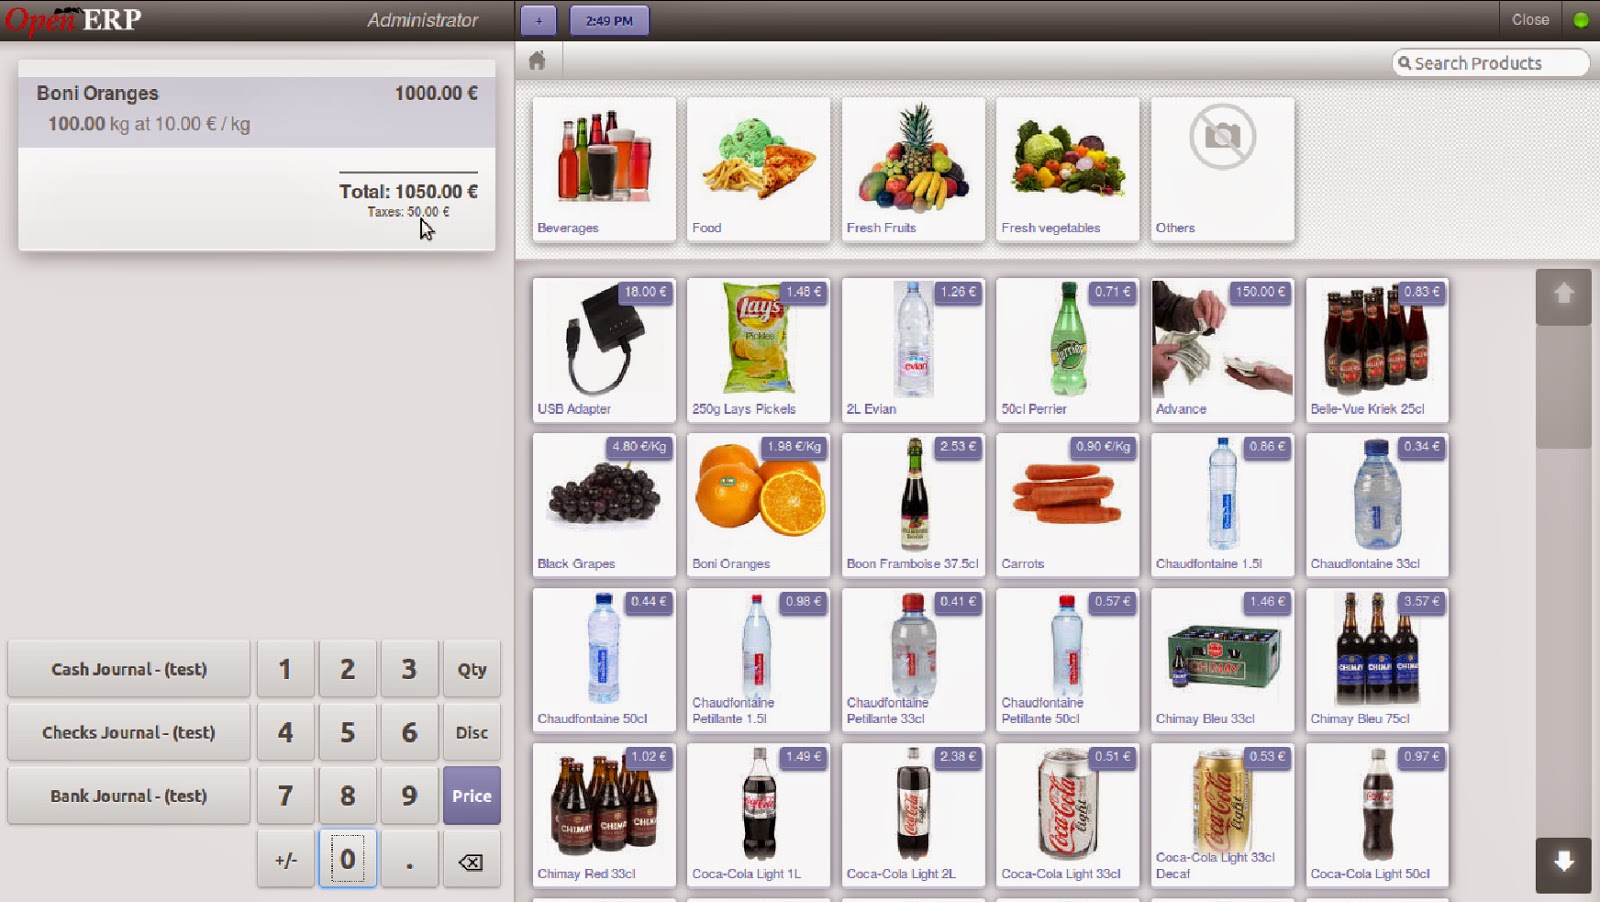
Now we can go to Point of sales and start the selling session. When we select the particular product Taxes will be applied which are from shop instead of product.


 Similarly if we have multiple online stores for which we can book normal sales orders, this will enforce the taxes appropriately.

This will work with third party e-commerce connector as well where online store taxes can be configured accordingly and same will carry forward in Odoo.

Thursday, January 22, 2015

Odoo OpenERP 8 University Management System

Pragmatic has introduced the latest version of University Management i.e. Odoo 8 University Management System by Pragmatic Techsoft.

This system is a complete solution for University management. It comes with several features like Student management , Library management , Transport management , Exams mangement etc.


 The following are some features of Odoo 8 University Management system.
 1.Admissions
This form keeps track of people came to take admission thentrough this their admission gets confirmed and that cadidate becomes a student of school/college. By clicking on open student profile button user get diverted to student profile.
 2. Student Profile :-
All the details of students like the assignment of that student,health related information and educational history of that student is also maintained.
 3) Faculty :-
Information of faculty is maintained through this form. Time table of that teacher as well as the subjects he teaches and library details related to his is also maintained.
 4. Time Table :-
Time table for the students is generated by this wizard.
 5) Library :-
library details are managed properly through this. Allocating a library cards to students and faculty. Keeps track of issued books and requsted books,authors and publishers as well of the various books and their movements.
 6.) Classroom Management :-
The record of the classrooms means which classroom is allocated to which class and the facilities (projector , light,fans etc) available in that class room.
 7) Exams :-
Exam information like exam template, exam sessions,criteria for the exam and resourses allocated for the exam as well as the attendees of exam are also manages through exam section.
 8) Result :-
Result of students of various exams is recorded. The marksheet of the student can be printed and the result templates also can be created.
 9) Hostel Management :-
Manageing the hostels in the school/college and the intake of hostel and the capacity of individual rooms and information of rent of the room allocation date and students to whom it is allocated is possible to manage.
 10) Students Migration :-
Students Migration from standerd to stanard is done. Those students who are passed in 1st year are sent to 2nd . And the standard of students gets changed and the new admission form for next year is automatically gets filled.
 11) Placements Offers :-
Information of placements offers to student get is also maintained.
 12) Transport Management :-
Information regarding the transportation facility provided by the school/college is managed. The routes of the transportation facility as well as the information of vehicle and the driver is also managed.
 13) Parents :-
Information of the parents of students is also managed.
 14) Fees structure :-
Predefined fee stucture is created to charge that much fees from all those students.
 15) Fees Register :-
Information of Fees register is also managed
 16) Attendence :-
Daily attendence and monthly attemdence of a any particular class is managed.
 17) Blog :-
The university can create blogs and publish articles .
 18) Website
The university can also use website for various purposes like admissions , publicity , accepting job requests and awareness . We can use various themes for the website.

Friday, December 12, 2014

Pragmatic Odoo 8- Authorize Dot Net Integration

Pragmatic has developed the long awaited Odoo 8 – Authorize.net integration. The deployment is done in 1-2-3 steps which is hassle free and meeting all requirements for credit card payments (matching PCI compliance).

1.Configuration
2.Transactions

Merchant Account Configuration
Settings > Companies > Configure the TransactionKey, LoginID and Test mode check box
 
Accounting Module
Set the Journal: Accounting > Configuration > Configuration >Journals>Banks (BNK2)
 
Order Processing
1.Create Sales order
2.Confirm and Create Invoice
a. Validate Invoice (do not register payment, as Authorize.net payment method would not be available here.)
3.Goto Accounts > Customer Payments
4.Create a New Payment – Select the Customer – all the validated orders are listed
5.Select the invoice that needs to be settled (check the box that has Pay) - Select Payment Type as Bank (Default)
6.The Authorize button and Credit Card info Tab is visible. (Run Calculate for the final amount)
7.Click on Credit Card info Tab and fill-in the card details.
8.Click on Authorize button
9.Verify the Authorize Code and Transaction ID
10.Save the transaction and Post.

1.Create Sales order
2.Confirm and Create Invoice
2.1.Validate Invoice (do not register payment, as Authorize.net payment method would not be available here.)

3.Goto Accounts > Customer Payments
4.Create a New Payment – Select the Customer – all the validated orders are listed.
5.Select the invoice that needs to be settled (check the box that has Pay) ) - Select Payment Type as Bank (Default)
5.1. (Run Calculate for the final amount)

6.The Authorize button and Credit Card info Tab is visible.
7. Click on Credit Card info Tab and fill-in the card details.


Note: Incase to verify Authorize.net Merchant Account, we can provide you the Sandbox account to find the postings, transaction Ids, settlements etc .
8.Click on Authorize button
9.Verify the Authorize Code and Transaction ID
10.Save the transaction and Post.

Merchant Email Receipt  
**Please DO NOT REPLY to this message. E-mail developer@authorize.net if you have any questions.
========= SECURITY STATEMENT ==========
It is not recommended that you ship product(s) or otherwise grant services relying solely upon this e-mail receipt.

========= GENERAL INFORMATION =========
Merchant : Binish Moulana (487955)
Date/Time : 9-Dec-2014 22:07:13 PST

========= ORDER INFORMATION =========
Invoice :
Description :
Amount : 100.00 (USD)
Payment Method : American Express
Type : Authorization Only

============== RESULTS ==============
Response : This transaction has been approved.
Authorization Code : KELXH4
Transaction ID : 2225300824
Address Verification : Street Address: Match -- First 5 Digits of Zip: Match

==== CUSTOMER BILLING INFORMATION ===
Customer ID :
First Name : East Street
Last Name :
Company :
Address :
City :
State/Province :
Zip/Postal Code :
Country :
Phone :
Fax :
E-Mail :

==== CUSTOMER SHIPPING INFORMATION ===
First Name :
Last Name :
Company :
Address :
City :
State/Province :
Zip/Postal Code :
Country :

======= ADDITIONAL INFORMATION ======
Tax : 0.00
Duty :
Freight :
Tax Exempt :
PO Number :

========== MERCHANT DEFINED =========
x_url : FALSE
Successful Credit Card Settlement Report.

 Your Authorize.Net ID is: 487955
Dear Binish Moulana, The following is your Credit Card settlement report for Wednesday,
December 10, 2014.
Transaction Volume Statistics for Settlement Batch dated 10-Dec-2014
21:01:04 PST:
Batch ID: 3938034
Business Day: 10-Dec-2014
Net Batch Total: 300.00 (USD)
Number of Charge Transactions: 3
Amount of Charge Transactions: 300.00
Number of Refund Transactions: 0
Amount of Refund Transactions: 0.00
To view details for a specific transaction, please log into the Merchant Interface.
1.Click "Reports" from the main menu
2.Select "Transaction Details"
3.Select "Settled Transactions" from the Item Type drop-down box.
4.Select the Settlement Date for the batch you would like to view from the "Date" drop-down box
5.Click "Run Report"
6.In the results, click on any transaction ID to view specific details for that transaction.

If you have any questions regarding this settlement report, please contact your bank or you can call Customer Support at 1-877-447-3938.

Thank You,
Authorize.Net

*** You received this email because you chose to be a Credit Card Report recipient. You may change your email options by logging into the Merchant Interface. Click on Settings and Profile in the Main Menu, and select Manage Contacts from the General section. To edit a contact, click the Edit link next to the contact that you would like to edit. Under Email Types, select or deselect the Email types you would like to receive. Click Submit to save any changes. Please do not reply to this email.

Thursday, November 6, 2014

Pragmatic Odoo 8 Saaskit

Are you starting to offer Odoo OpenERP to your customers in the cloud. Do you want to avoid having to write the Subscription Management, Recurring Billing, and Credit Card Management code? 

The Odoo OpenERP Saas Kit / Script gets your new Odoo OpenERP software-as-a-service site to a running start by providing you a well-tested and proven site management system with PayPal payments. You also get a framework for building membership-based applications, including account signups/upgrades/downgrades, tiered pricing levels, multi-tenant data security in a single database.


Following are the major highlights of Odoo OpenERP Manufacturing Management
1) Works with Odoo OpenERP 8.0
2) Sub-domain support with individual customers getting their own sub-domains or domains
3) Sub-domains URLS with only 1 Database listing thus isolating users from seeing other databases
4) Removal of Database creation URL so that no one can create a new database.
5) Supported gateways: PayPal
6) Support for a Demo site with a direct lead creation in Odoo OpenERP CRM
7) A separate URL is provided for the administrator to create databases.
8) Automated trial versions which expires in 30 days.
9) Self-serve account creation.
10) Ability for users to reset their own passwords (Forgot your password?)
11) Support for SSL with a digital certificate.
12) Ability to monitor the databases system wise
13)Ability to increase and decrease the number of users for each database
14)Ability to send automatic invoices every month

Wednesday, October 29, 2014

Odoo 8 Magento Integration

We provide Odoo 8 Magento integration services. Magento is a good platform for front end of your web shop and Odoo acts as a perfect back office application supporting all the business processes required by a company.


Following are the major highlights of Odoo OpenERP Manufacturing Management
1) Product catalog export from Odoo to Magento and Sale orders imports from Magento to Odoo. Users can import catalogues, categories and products along with customers information and addresses. The Magento Odoo connector imports every order status including the cancelled orders. The other imported orders are pending, enqueued, started, done or failed. The connector also creates a contact if it did not exist earlier.
 2) Product stocks updates, based on Odoo virtual stocks (number of products in the physical stock that have not been reserved yet)
3) Synchronization: The Magento Odoo connector processes the import of orders on the basis of the order status in Odoo, thus synchronising the information across the e-commerce and Odoo platforms.
4) Management of product types: The Magento Odoo connector supports the import of all types of products except configurable products helping the users to maintain a perfect record of the inventory by creating a bill of materials for bundled product types.
5) No Duplication: One individual task is created for each record to import in Odoo for sales order, customer, product and other categories thus reducing data redundancy.
6) Fully Tested: The connector and the integration is completely scrutinized by unit test cases which check the functionality with different order and product types and other combinations.
The testing ensures that the connector behavior is predictable and active development does not hinder the working features. You can see it for yourself. The connector is still missing a few functions, which have been added to our to-do list. Here are the to-do functions:
1.Multi-language support
2.Handling of configurable products
3.Show Odoo OpenERP invoices on Magento customer account.

7) Product Category tree export, including creation and update


Tuesday, October 28, 2014

Odoo OpenERP Manufacturing Management MRP MPS

Odoo OpenERP Manufacturing helps manufacturers especially those that operate within a different mode (process, discrete, repetitive, etc.) environment—design, manufacture, and distribute products in a timely fashion; use appropriate processes that optimize resources; material, machinery, tools etc and satisfy the expectations about quality and delivery.


Following are the major highlights of Odoo OpenERP Manufacturing Management
1) Integrate manufacturing resources to improve your efficiencies and competitive nature
 2) Handle different manufacturing modes with an enterprise-wide system where all processes utilize common material, planning, procurement, and financial costing databases 
3) Enable quick processing through different features through which you can complete the end to end flow
4) Utilize all the potential facilities and resources to effectively transition the manufacturing flow on the shop floor
5) Advanced shop floor control with use of scanning through traveller, labels and efficiency matrix
6) Manage the WIP,semi-finished items without much hassle, also track inventory and costing related to operations as individual or all at once.
7) Bird's eye view through MPS and forecasting to effectively manage and utilize the capacity and projections
8) Production Planning based on MPS throughout the flow which will cut down the decision making on the floor
9) Manage MTS or MTO or Assemble to Order processes within the system which efficiently manage the inventory levels

Material Resource Planning manages the auto procurement for production. It can also be set with minimum quantity.

With advanced features such as Master Production Schedule, it does Advanced Planning and Scheduling. Resources can be scheduled well in advanced against Order or Against Make to Stock. It comes with a neat Gantt chart which visualises the load on resources and completion of the production.

It comes with Real Time Inventory Valuation. Journal entries against Manufacturing Orders are posted consisting of Material cost, Work Centres cost and Labor cost.

Master Production Schedule – Make to Stock
Master Production Schedule module is designed to help manufacturers develop an attainable schedule while balancing internal constraints and limited resources and achieving Advanced Planning and Scheduling. MPS for Make to Stock enables to Schedule the production against stock. MPS balances machine capacity and acknowledges labour to develop a realistic plan of action to move production through various operation steps. The user benefit is that generated schedules are realistic and achievable on the plant floor because the production constraints on the plant floor are considered and modelled.


Key Features
 1) Track each Production Order through each respective routing step and know where each part should be at any particular time. 
2) Keep track of all required resources for each manufacturing step and know the availability of each resource at any particular time.
3) Represent time in a detailed manner (e.g. minute by minute). Machine run time can be defined as - per hour
4)Schedule orders (i.e. manufacturing steps) only when resources are available.
5) Detailed working Time for work centres.
6) Consideration of preventative maintenance (Resource Leave) and other machine down time in Scheduling.
7) Can be Scheduled for any of the month
8) Routing selection is provided at the time of Schedule generation
9) Multiple Tentative Schedules can be generated and changed before freezing it.
10) Multiple products can be scheduled in one Schedule Plan

In Open ERP we have developed the module for managing the MPS.Pre requisites for MPS are BOM, Operations, Work centres, Routing, Resource Working Time, Resource Leave (Down Time).
MPS -Make To Order
Master Production Schedule module is designed to help manufacturers develop an attainable schedule while balancing internal constraints and limited resources and achieving Advanced Planning and Scheduling. MPS for Make to Order enables to Schedule the production against Sales Orders. MPS balances machine capacity and acknowledges labour to develop a realistic plan of action to move production through various operation steps of Sales Orders to be delivered and gives the realistic delivery dates. The user benefit is that generated schedules are realistic and achievable on the plant floor because the production constraints on the plant floor are considered and modelled.


Key Features
 1) After selecting the Sales Order, Start date and Delivery date automatically populates 
2) Start Date can be changed so the delivery date changes accordingly
3) Track each Sales Order through each respective routing step and know where each part should be at any particular time.
4)Keep track of all required resources for each manufacturing step and know the availability of each resource at any particular time.
5) Represent time in a detailed manner (e.g. minute by minute). Machine run time can be defined as - per hour
6) Schedule orders (i.e. manufacturing steps) only when resources are available.
7) Detailed working Time for work centres.
8) Consideration of preventative maintenance (Resource Leave) and other machine down time in Scheduling.
9) Can be Scheduled against single Sales Order or Sales Orders for particular period
10) Routing selection is provided at the time of Schedule generation

In Open ERP we have developed the module for managing the MPS for Make to Order.Pre requisites for MPS are Sales Orders, BOM, Operations, Work centres, Routing, Resource Working Time, Resource Leave (Down Time).