Thursday, June 30, 2016

Biometric Device Integration with Odoo HR Timesheets


About Biometric

Biometrics are being used to establish better and accessible records of the hours employee's work. With the increase in "Buddy Punching" ( a case where employees clocked out coworkers and fraudulently inflated their work hours) employers have looked towards new technology like fingerprint recognition to reduce such fraud. Additionally, employers are also faced with the task of proper collection of data such as entry and exit times. Biometric devices make for largely foul proof and reliable ways of enabling to collect data as employees have to be present to enter biometric details which are unique to them.


User Management safescan Features
  1. Register NEW USER / SUPERVISOR / ADMIN
  2. Register USER or SUPERVISOR with fingerprints
  3. Register user with RFID Badge / KeyFob
  4. Register user with password
  5. Register user with Fingerprint and Password
  6. Register RFID Back-UP
  7. Register backup finger to an existing user (more than one FP for the same user)
  8. Tip for a successful use of the fingerprint sensor positioning of the finger
  9. Delete user account
  10. Delete user logs
  11. Delete all user data (including log data)
  12. Delete Supervisor or Admin accounts
  13. Reset the terminal


Safe Scan Biometric Device Configuration on Windows
Installed the safe scan software in windows system according the operating system bit 32/64 for the access biometric device and change setting for the data backup.

Start Safescan Application
Click on File Menu > Preferences
Choose Language, Action, Clock, Database Connection and Backup Location
Automatic Backup

Note:- Database backup connection .\xyz.fbd ( .fbd is a firebird database format)
If you want to access and view biometric data. Need to install firebird in windows system. Safe Configuration Details

Safe Scan Configuration Screen


Safe Scan Users In and Out Time data stored in Firebird Database


Scripting
After Biometric Data Backup In Windows System Specification Location. We will need to write Script for the Connect Database and restore firebird database table from windows to Linux (Ubuntu Server).

Windows 8 Task Scheduler
Control Panel>All Control Panel Items>Administrative Tools>Task Scheduler


Odoo installation and Configuration On Linux (Ubuntu)

Installed ubuntu 64 bit operating system
Installed postgres database
Installed firebird (open source database)
Installed All other required software and package for the odoo server.


Odoo provide HR Module for these configuration. You need to install and configure HR module.
And Check in Odoo Human Resources


Firebird database installed in ubuntu and configured the admin panel and access
Firebird Data Display


The FBD File is dumped using Windows Scheduler in to Ubuntu machine. Odoo Scheduler runs and picks up the FBD file. This file is parsed and the sign in and out time data is synced with Odoo HR module.


Monday, June 27, 2016

Human Resource Management System (HRMS)


With Odoo 8 HRMS module, Pragmatic has provided HRMS module which providesPayroll integration with Attendance and leave management and also some compliance reports are provided as per Indian localization.

Features of this module are as follows.
1) Attendance and leave management
2) Payroll
3) Compliance reports


1) Attendance and Leave management
a) Attendance module in Odoo captures attendance of employees by directly entering attendances in the system or importing attendance data from external sources (file import). Work schedules can be defined in the system which are to be linked to the employee contract. Half day limit (in hours), full day limit (in hours) and recess time can be defined in work schedule.


b) Leaves module in Odoo provides leave management functionality, where employee can requestleave which is required to be approved by manager. Leave types can be configured in the system and whether it is paid or unpaid leave also can be configured.


2) Payroll
a) Employee configurations:
Employee declaration for TDS:


b) Employee payslips
As per monthly attendance , approved leaves of the employee and salary structure, employee payslip for the month is generated. Several salary structures can be defined in the system. Salary structure contains salary rules such as HRA, DA, PF etc. Contribution register can be defined for each salary rule.


c)Payslip batches
Employee payslips can also be generated in batches ( For example monthly payslip for all employees).


3) Compliance reports:
2.1) PF report:
PF report is in csv format as per requirements of online ECR/challan generation.


2.2) ESIC report:
ESIC report is also in csv format as per requirements of online challan generation.


2.3) PT report:
Similarly PT report is also as per requirements of online challan generation.


Wednesday, June 15, 2016

Odoo 9 Loan Management System

As name suggest, loan management module is blend of all important functionalities like manage different type of loan, different calculation mode, borrowed & issued loans, loans with installment repayments with accounting entry, annuity repayment, possibilities for entering special repayments and many more options with it.

Features of Pragmatic Loan Management are
  1. System helps you to create customized loan period.
  2. You can categorize type of loan and manage it.
  3. Loan types can be defined based on its calculation method(Flat and Reducing).
  4. System allow you to compute installment based on amount, intrest rate and period run time.
  5. System maintains all interest versions which company wants to define.
  6. It allows managing type of proof that company accepts and keep track.
  7. You can keep track of all installment received from a customer with accounting entry.

Loan period interface


Loan Proof

Loan type interface

Loan Type Version

Run Time Interface to compute EMI (Reducing)

.

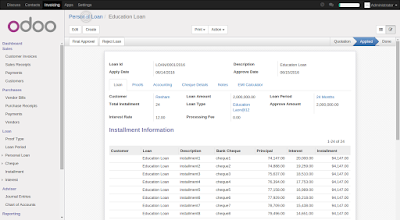
Loan Form

Saturday, June 11, 2016

Pentaho Business Analytics Community Edition Load Balancing and Auto Scaling on Amazon AWS Cloud

Pentaho Business Analytics Community Edition Load Balancing and Auto Scaling on Amazon AWS Cloud

Pentaho is a very powerful open source Business Analytics platform. IIt comes with built in ETL Kettle along with Dashboarding. Analytics and reporting capabilities. Pentaho Enterprise Edition comes with built- in load balancing for deployment. But the Pentaho Community Edition lacks this capability. Pragmatic has cra a scalable architecture with AWS cloud to support Auto Scaling. This is generally required when large number of users can impact the performance. This is bug shift from the traditional single server architecture. With the Pentaho COmmunity Edition Auto Scaling architecture anyone can leverage the benefits of Community Edition with performance comparable to Enterprise Edition. Once can scale up and down depending on the loads. The following shows the scalable cloud architecture


PENTAHO ON AWS RDS, ELB AND AUTOSCALING

Odoo 9 OpenERP Rental Management

Rental Management is need of requirement for service organization which deals with the products rented to the customer for specific time and get the returns after the tenure is over. Moreover they need to track their serial nos and recurring invoicing for the rented period so that proper financials can be tracked and achieved.

Pragmatic had developed a module which takes care of this requirement to cater services organizations to rent the stockable product and track its lifecycle including repairs till the time it completes its tenure at the customer location. This Rental Management is implemented in Odoo along with other functionaries integrated i.e. Warehouse, stock, recurring billing etc.

It also facilitates to analyse the equipment or product ROI based on Total Rent Collected for a specific period which is updated based upon the payment received against the invoice raised.

Major feature is ease of operation or creation of rental agreement documented generation through the module itself and quick order creation from Quant object in new Odoo WMS

Features of Pragmatic Rental Management are

1. Rental order creation and confirmation with serial no
2. Delivering the product to the customer with correct serial no
3. Recurring Billing of the Rental through Subscription management through schedulers to generate invoices to customers
4. Closing of the Rent tenure to facilitate the automated incoming shipments to bring back the rented product
5. Replace the existing rented product with alternate or new product
6. Managing the Product/Asset status according to Rented or Ready for rent or New


Wednesday, June 8, 2016

Microsoft OUTLOOK AND ODOO INTEGRATION

Microsoft OUTLOOK AND ODOO INTEGRATION

Deployment, configuration

System Requirements For Odoo Server and Windows Client

  • Server module requires Odoo
  • Outlook add-in works with Outlook 2010 and above.
  • Outlook add-in requires Microsoft .NET Framework 4.0 to be installed OR above on the client machine.


How it works
  • In order to work our Outlook add-in requires server-side Odoo module to be installed and configured as preferred:
  • First of all you need to download and configure plugin_outlook models in Odoo.


Deploy and Configure the Server-side Odoo Module
  • Copy folder named os_plugin_outlook to the location where all your Odoo addons are installed.
  • Restart odoo service and login odoo
  • Update Module List
  • Search the outlook module in apps and installed


Note:- Download outlook Module and outlook plugin

https://apps.odoo.com/loempia/download/plugin_outlook/7.0.1.0/5uAw76PX178xXR1APa2kGH.zip?deps


Go to setting > configuration >sales (There is show mail client outlook)


Client Windows System Configuration
Download Openerp Outlook Plugin and installed on the Client system. Find below Link for the download the plugin

Link-1

https://raw.githubusercontent.com/tpher/odoo-extra-outllok-plugin-changed/usenetoffice/plugin_outlook/static/openerp-outlook-plugin/OpenERPOutlookPluginSetup32.msi

Link-2

https://git.framasoft.org/framasoft/OCB/raw/5601fbd78c04c63e3d298328b285d992634ad4f7/addons/plugin_outlook/static/openerp-outlook-plugin/OpenERPOutlookPluginSetup32.msi

Open Outlook and click in ADD-INS


You can find the openerp add-ins plugin
-Contact
-Documents
-Configurations


Click on Configuration and click on change and type odoo server with port
Database name,
Database username and password
Click on connect


Successfully login to openerp


Now you can click in documents and push document in odoo module


Click on Contact and link to odoo module partner